
Which darts ultimate guide on how to throw darts with precision for beginners. Turning on the TV and watching the likes of Luke Littler and Luke Humphries throwing darts at the dartboard makes you think darts is easy right? Then throwing darts for the first time you wonder how they make it look so easy right? Allow us to make it easier for you with our guide on how to throw darts.
How to throw darts with precision for beginners
It is important that everything feels comfortable and natural to you when starting out throwing darts. If you are a darts beginner we suggest starting out throwing at the dart board in a way that feels comfortable to you for a while first. Then move steadily through our guide to throwing darts with precision remembering to feel comfortable.
Our guide to throwing darts for beginners contains the following tips and tricks for beginners:
- How to hold a dart
- Finding your darts stance
- How to aim a dart
- How to release a dart
- Things to help you improve your throw
[amazon_auto_links id=”1482″]
Best way to hold a dart
Possibly the most crucial part of throwing a dart is how you hold it. This is called the grip, and it can vary for every player. There is no single correct way to hold a dart and you will almost certainly try many different grips. The best way to throw a dart for you should be comfortable and consistent for each throw.
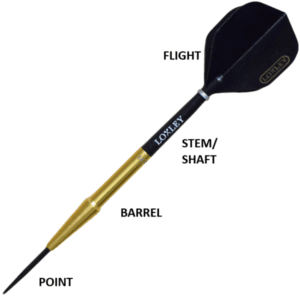
Learning how to grip a dart involves understanding the different parts of a dart, this is known as the darts setup. The graphic above shows the four parts of the darts as fully setup for throwing: the point, barrel, shaft, and flight. Players typically grip the barrel of the dart, and sometimes also touch the point or shaft while throwing.
The number of fingers you use to hold a dart is up to you. Most players use three fingers (thumb, forefinger, and middle finger). Some use two fingers (thumb and forefinger), and others might use four fingers, excluding the pinkie.
There are also different ways to hold the dart based on your grip position. A rear gripper holds the dart at the back of the barrel (near the flight), a front gripper holds it at the front (near the point), and a middle gripper holds it in the center. Darts are often designed with these grips in mind; for example, a ‘front-loaded dart’ is aimed at front grippers.
The key thing to remember is that you need to be in control of the dart in your hand. Ensure that each finger involved in your grip contributes to holding the dart and not interfering with each other.
Besides being comfortable, your grip needs to be stable to ensure a consistent throw. Keep your fingers straight and don’t grip the dart too tightly, just enough to maintain control, gripping too hard will force the dart off course and prevent a consistent release.
Best darts stance for beginners
As with holding the dart we reccomend that the first few times you throw your darts standing in a way that feels comfortable. Standing by the throw line just release the darts using the grip you have made based on our guide above. We reccomend using a darts mat as they come with the correct distance from the dartboard marked on them to ensure positioning as tournaments and leagues use these, and you wont be surprised the first time round.
Throw Line: More commonly known in darts as the oche, it is the mark on the floor that you have to stand behind when throwing your darts. The official throw line in steel tip darts is 7 feet 9¼ inches (2.37m), and for soft tip, it’s 8 feet (2.44m). At home, it helps to upgrade your dart setup with an oche or a mat so you always know where to stand when throwing darts.

Illustrated above are the three stances used by 3 of the PDC darts champions. There is no right or wrong way to stand, but it’s important to use the same stance every time you throw. Try several of them until you find one that feels comfortable.
Forward Stance: This is a great starting position for beginners. To achieve this, place your toe just on the oche and put your dominant foot in front of you. If you’re right-handed, this would be your right foot, and if you’re left-handed, it’s your left foot. Most of your weight should be on this foot, and you should lean towards the board while keeping your other foot for balance.
Closed Stance: Place the side of your dominant foot against the throw line. For right-handers, this would be the right side of the right foot; for left-handers, it’s the left side of the left foot against the oche. Your other foot is placed behind you for support.
Open Stance: Both of your feet are placed in front of you and against the oche. Since you cannot lean forward in this stance, the dart will be released further away from the board. This is also known as the front stance. Joe Cullen is a professional darts player who adopts this stance.
Top Tip: With all these stances, it’s essential to keep your shoulders and hips straight and avoid leaning too far forward, as this will become uncomfortable over time. Choose which stance works best for you in terms of maintaining a steady base whilst releasing the dart.
Consistent aim to throw better darts
A consistent aim is key to ensuring a more precise throw at the dartboard. Start with what feels natural to you before moving on to any of the tips and tricks below.

The most common way to improve precision in darts is to throw “from your eye”. Hold your first dart in your throwing hand and bring it to eye level. If you’re right-handed, use your right eye to aim; if you’re left-handed, use your left eye.Position the dart to the side of your eye and make sure the elbow of your throwing arm points towards the dartboard. Ensure your shoulder, elbow, and hand are aligned, forming a 90-degree angle. Aim the dart at your target and focus on the target with your dominant eye, rather than looking at the dart.
Top Tip: Keep your elbow level as a final step before throwing the dart. Dropping or raising your elbow during the throw makes it harder to be consistent. Use the upper part of your arm as a base, like a catapult. Make sure your elbow has minimal sideways movement when you throw.
Watching the pros like Joe Cullen and Michael Smith releasing the dart you could be forgiven thinking that they don’t aim. Nothing could be further from the truth, they have a release which doesn’t follow the eyeline but has been crafted over the years. Their success is based on them adressing the board in the same way everytime (stance), gripping the dart the same way everytime (comfortable grip), and a consistent release (throw), all of which coming together every single dart through repetition.
Conclusion: Combining factors to improve your darts throw and accuracy
Now, with your stance, grip, and aim all sorted, it’s time to start throwing! You have now tried the various steps to ensure what came naturally has been tweaked and now also feels comfortable to you. It is time to bring it all together to create a more precise throw and improve your darts!
- Stand in your favoured stance at the oche, hold the darts in your non-throwing hand and transfer the first dart to your now comfortable grip.
- Aim the dart, bring it back towards you, and in a forward motion, release it. Aim to release as you near the end of extending your arm forward.
- Snap your wrist as you let go of the dart, letting your arm continue in a throwing motion so your fingertips point towards the target and your arm finishes fully extended in front of you.
Remember that repetition is key to feeling comfortable, without this you may see temporary improvement (a big score for example) but practice ractice and practice some more. Don’t be disheartened by a stray dart as this is bound to happen until you perfect your own darts stance, darts grip, and darts release. Once you have achieved consistency in these factors you might consider trying different darts setups. A dart setup is the barrel, the shaft/stem and of course the dart flights, each of which will change the trajectory of your darts.
Other articles you might like: