
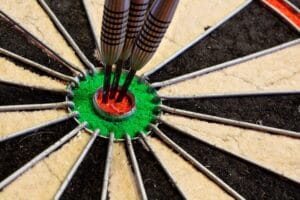
Without doubt the most important aspect of darts is the checkout, where a player must finish a leg by hitting a double or the bullseye. As such, darts checkouts are also more commonly known as a “finish” as the checkout in darts finishes the leg being played. We have all had that leg of darts where we get to a finish in quick time only to take more darts than Peter Wright carries in his case to hit the double, nothing is more frustrating.
Understanding the Checkout in Darts
A checkout in darts refers to the combination of darts needed to reduce a player’s score to exactly zero, ending with a double or the bullseye. The highest possible checkout in darts is 170, achieved with a treble 20, treble 20, and bullseye. This is often referred to as the big fish as it is the hardest finish to reel in. In recent times we are actually seeing more professional players taking out the 170 finish, with the straight nature of the finish perhaps being the reason more players leaving it as their checkout (With 2 darts in treble 20 and the bull being only slightly lower on the board players don’t need to traverse as much as in the case of a 167 checkout for example).
The Importance of Checkout Charts and Tables
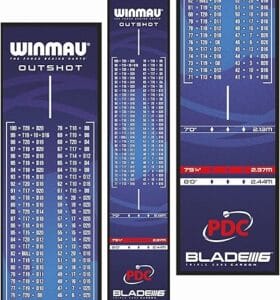
To keep your rhythm and fluency going on the oche in darts, it’s essential to familiarise yourself with the various darts checkouts charts. Placing a darts checkout chart next to your dartboard will help you identify the best possible outshots from the score remaining. Using a darts checkout table will ensure you always have a plan when you step up to the oche. In time, when the dart checkouts become second nature you will find you are much more confident. There are many chart available online but feel free to download and print our dart checkout chart as a pdf.
Download and print our darts checkout chart
There are many dart checkout charts and tables available online but feel free to download ours below. This dart checkout table is in pdf form and is free to use!
Which darts downloadable darts checkout chart
How to Checkout in Darts
- Know Your Numbers: Understanding the different combinations that can lead to a successful checkout is crucial. For example, if you have 40 left, you need to hit a double 20. If you have 32 left, you need to hit a double 16.
- Practice Regularly: Consistent practice is key to fluency when it comes to darts checkouts. Make sure to spend time practising different outshots and combinations to increase confidence in pressure situations.
- Use a Darts Checkout List: A darts checkout list can be a handy reference during practice sessions. This list includes common checkout combinations for various scores, helping you quickly recall the best options.
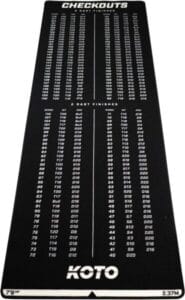
Another great tool for checkouts is a darts mat. These are two of the best dart checkout table darts mats on the market at the moment as they also have oche lines and protect your floor and dart points from bounceouts:
Dart outshot table on a darts mat
Learning and making Darts Checkouts second nature
To learn how to checkout in darts, start by focusing on the most common outshots. Here are a few tips:
- Start Small: Begin with lower scores and gradually work your way up to higher checkouts. This will help you build confidence and accuracy.
- Practice with Purpose: Set specific goals for each practice session, such as hitting a particular double or mastering a specific checkout combination.
Darts Outshots and Strategies
Darts outshots refer to the specific combinations of darts needed to finish a leg. Here are some common outshots and strategies:
- 170 Checkout: Treble 20, Treble 20, Bullseye
- 167 Checkout: Treble 20, Treble 19, Bullseye
- 164 Checkout: Treble 20, Treble 18, Bullseye
When aiming for a checkout, always have a backup plan. If you miss your target, know the next best option to still finish the leg efficiently.
The Role of Practice in Mastering darts Checkouts
Regular practice is essential for mastering darts checkouts. Here are some practice tips:
- Focus on Doubles: Spend time practising doubles, as hitting a double is required to finish a leg. Yes it is nice to hit a 180 in practice but the doubles are what really count in matches
- Simulate Match Conditions: Practice under conditions that mimic a real match, including time constraints and pressure situations. A good simulation is setting yourself 6 darts to finish 101. Every time you succeed add 2 points to the next finish you have to hit.
- Track Your Progress: Keep a record of your practice sessions to monitor improvement and identify areas for further development. Challenge yourself in practice, if a previous session had you struggling to hit a 121 outshot, or you missed double 16 time and again, practise more on these each time you go through your routines.
List of the most common ways to finish a leg of 501
Scores from 2 to 40 (Single Dart Finishes):
2: D1
4: D2
6: D3
8: D4
10: D5
12: D6
14: D7
16: D8
18: D9
20: D10
22: D11
24: D12
26: D13
28: D14
30: D15
32: D16
34: D17
36: D18
38: D19
40: D20
Scores from 41 to 50 (Two-Dart Finishes):
These typically involve a single or triple to set up a double.
41: S9, D16 or S1, D20
42: S10, D16 or S2, D20
43: S3, D20 or S11, D16
44: S12, D16 or S4, D20
45: S5, D20 or S13, D16
46: S6, D20 or S14, D16
47: S7, D20 or S15, D16
48: S16, D16 or S8, D20
49: S9, D20 or S17, D16
50: S10, D20 or B (Bullseye) or S18, D16
Scores from 51 to 170 (Two or Three-Dart Finishes):
These are more complex, often involving combinations of singles, triples, and a final double or bullseye. Many scores have multiple ways to check out, but here are common and efficient paths.
51: S11, D20 or S19, D16
52: S12, D20 or S20, D16
53: S13, D20 or S1, D20, D16
54: S14, D20 or S18, D18
55: S15, D20 or S1, D18, D18 (unlikely)
56: S16, D20 or S20, D18
57: S17, D20 or S19, D19
58: S18, D20 or S20, D19
59: S19, D20 or S19, D20
60: S20, D20
61: S11, D25 (S11, S25 then D13 or T15, D8)
62: S12, D25 or S10, D20, D16
63: S13, D25 or S13, D20, D15
64: S14, D25 or S14, D20, D15
65: S15, D25 or S15, D20, D15
66: S16, D25 or S16, D20, D15
67: S17, D25 or S17, D20, D15
68: S18, D25 or S18, D20, D15
69: S19, D25 or S19, D20, D15
70: S20, D25 or S20, D20, D15
71: T13, D16 or T11, D19
72: T12, D18 or T14, D15
73: T19, D8 or T15, D14
74: T14, D16 or T18, D10
75: T15, D15 or S25, D25
76: T16, D14 or T12, D20
77: T17, D13 or T15, D16
78: T18, D12 or T14, D18
79: T19, D11 or T13, D20
80: T20, D10 or T16, D16
81: T19, D12 or T15, D18
82: T14, D20 or T16, D17
83: T17, D16 or T13, D20, D15
84: T20, D12 or T16, D18
85: T15, D20 or T17, D17
86: T18, D16 or T16, D19
87: T17, D18 or T19, D15
88: T20, D14 or T16, D20
89: T19, D16 or T17, D19
90: T20, D15 or T18, D18
91: T17, D20 or T19, D16
92: T20, D16 or T16, D20, D16
93: T19, D18 or T17, D18
94: T18, D20 or T14, D20, D16
95: T19, D19 or T15, D20, D20
96: T20, D18 or T16, D20, D20
97: T19, D20 or T17, D20, D20
98: T20, D19 or T18, D20, D20
99: T19, D20, D10 (T19, S10, D16 or T19, S1, D20)
100: T20, D20 or T20, D20 (T20, S20, D20)
101: T20, S1, D20 or T17, S10, D17
102: T20, S2, D20 or T18, S10, D17
103: T20, S3, D20 or T19, S10, D17
104: T20, S4, D20 or T18, S10, D18
105: T20, S5, D20 or T19, S10, D18
106: T20, S6, D20 or T18, S10, D19
107: T20, S7, D20 or T19, S10, D19
108: T20, S8, D20 or T18, S10, D20
109: T20, S9, D20 or T19, S10, D20
110: T20, S10, D20 or T20, S10, D20
111: T20, S11, D20 or T17, S20, D17
112: T20, S12, D20 or T18, S16, D14
113: T20, S13, D20 or T19, S16, D14
114: T20, S14, D20 or T18, S18, D14
115: T20, S15, D20 or T19, S18, D14
116: T20, S16, D20 or T18, S20, D14
117: T20, S17, D20 or T19, S20, D14
118: T20, S18, D20 or T18, S18, D16
119: T20, S19, D20 or T19, S19, D16
120: T20, S20, D20 or T20, S20, D20
121: T20, T1, D20 (T17, T10, D20)
122: T18, T12, D20 or T20, T10, D16
123: T19, T14, D16 or T20, T13, D12
124: T20, T14, D16 or T18, T10, D18
125: T20, T15, D15 or T19, T12, D14
126: T19, T19, D6 or T18, T18, D6
127: T20, T17, D8 or T19, T16, D7
128: T18, T14, D16 or T20, T16, D6
129: T19, T16, D12 or T20, T19, D6
130: T20, T20, D5 or T20, S20, B
131: T20, T13, D16 or T19, T14, D18
132: T20, T16, D12 or T19, T15, D15
133: T20, T19, D8 or T17, T16, D16
134: T20, T14, D16 or T19, T17, D12
135: T20, T15, D15 or T19, T18, D10
136: T20, T20, D8 or T19, T19, D10
137: T20, T19, D10 or T19, T17, D14
138: T20, T18, D12 or T19, T19, D11
139: T19, T14, D20 or T20, T13, D20
140: T20, T20, D10 or T19, T17, D16
141: T20, T19, D12 or T17, T18, D18
142: T20, T14, D20 or T18, T16, D18
143: T20, T17, D16 or T19, T16, D18
144: T20, T20, D12 or T18, T18, D18
145: T20, T15, D20 or T19, T16, D18
146: T20, T18, D16 or T19, T19, D16
147: T20, T17, D18 or T19, T18, D18
148: T20, T20, D14 or T18, T18, D16
149: T20, T19, D16 or T19, T19, D16
150: T20, T18, D18 or T20, T20, D15 (also B, B, B for intimidation, not common finish in professional matches but often thrown in exhibitions)
151: T20, T17, D20
152: T20, T20, D16
153: T20, T19, D18
154: T20, T18, D20
155: T20, T19, D19
156: T20, T20, D18
157: T20, T19, D20
158: T20, T20, D19
159: (Bogey Number – No 3-dart finish)
160: T20, T20, D20
161: T20, T17, B
162: (Bogey Number – No 3-dart finish)
163: (Bogey Number – No 3-dart finish)
164: T20, T18, B
165: (Bogey Number – No 3-dart finish)
166: (Bogey Number – No 3-dart finish)
167: T20, T19, B
168: (Bogey Number – No 3-dart finish)
169: (Bogey Number – No 3-dart finish)
170: T20, T20, B (known as “The Big Fish”)
Conclusion
Just like hitting big scores, the art of finishing a leg in darts requires a combination of knowledge, practice, and mental fortitude. Get to know the darts checkouts, and make sure to practise your doubles and dart checkout routines regularly!
Other popular articles you might like: